Tuesday, January 17, 2017
Using your computer as your alarm clock
Using your computer as your alarm clock
Using your computer as your alarm clock.
What does every teen do? Go to school. And what does every teen use to wake up? Either a radio alarm that plays anything you want as long as its static, or a loud, obnoxious BUZZ BUZZ BUZZ until you throw it out the window. How can you save money on broken alarm clocks which can add up after a while? Use your computer to play your favorite song at the time you need to wake up. Who would have thought of that? You’ve got a computer in your room that is turned on 24/7, so it’s available, and you’ve also got an alarm that is on 24/7 that is annoying. Throw the alarm out the window once and for all and use your computer.
I’ve split this guide into two portions. The first is for all of you Windows users out there, and the second part is for all of you Linux users out there.
Windows
Windows is quite simple to get set up as a fully working alarm clock. All you need is your favorite music playing software. I prefer to use WinAmp because it’s small, and has a few other options that you can use (streaming to other computers to wake up the whole house for instance 
Step 1:
Collect your music. It doesn’t matter where you get it from, as long as whatever music player your using can play it (as a rule of thumb, just stick with MP3s).
Step 2:
Build your .M3U playlist file. Using “Notepad” (under “Accessories” in the start menu), it creates a pure text file without any formatting that Microsoft Word or Wordpad will put in it.
Here’s the look of the .M3U file:
#EXTM3U
song1.mp3
song2.mp3
song3.mp3
and so on.mp3
Just save this as “alarm.m3u” to wherever your music is saved.
Step 3:
Create a “batch” file that will start your playlist. A batch file is simple in this respect. Run a single command that opens and starts playing your playlist automatically. Save this as “alarm.bat” in the same place as your playlist file.
Here’s what your batch file should look like:
start alarm.m3u
And that’s it for the file portion of the alarm clock.
Step 4:
Create a “Scheduled Task” to start the batch file at the desired time. Under the “Control Panel”, there is an “applet” called “Scheduled Tasks.” Create a new task, and where it asks for the program to run “Browse” to the “alarm.bat” file that we created earlier. Set the time, and you have yourself a custom alarm clock.
Note:
If you set your music player to shuffle, it won’t start with the same song every morning.
Go to link Download

Sunday, January 15, 2017
Using Regdevelop to create Windows Update Registry Program
Using Regdevelop to create Windows Update Registry Program
This tip will save you a lot of time removing some annoyances to your computer problems

One day, your computer automatically updates your windows installation, taking some few control out of it is good in our daily maintenance of our computer e.g. Turning off Autorun feature in Windows 7 and Windows update registry hacks.
Instead of going to the process again and again for maintenance and using the registry editor, just create a simple software for that.
If you have some experiences editing your windows registry, using Regdevelop is quite easy.
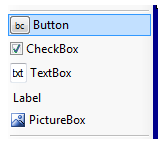
Drag the CheckBox control to the form and start configuring the program

Caption
Stop Windows update from changing the sleep/shutdown to “Install Updates and Shutdown"
RegKeyPath1
HKEY_CURRENT_USERSoftwarePoliciesMicrosoftWindowsWindowsUpdateAU
Value_Name1
NoAUAsDefaultShutdownOption
ValueData1
1
ValueType1
DWORD
In the UNCHEKED function of CheckBox Control simply changing the option to false will automatically set the ValueData2 to 0
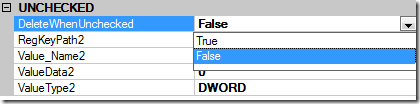
After that, you can proceed with other checkbox options like getting rid of Windows update option

No Auto Reboot While Users are Logged On and Turning Off Windows from searching for Updates
Read here for the configuration details
Also, There’s an “Automatic installation of certain updates that neither interrupt Windows services nor restart Windows” feature in windows using AutoInstallMinorUpdates value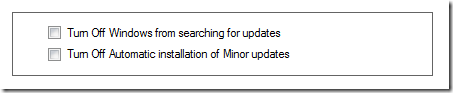
For creativity, Adding a picturebox control creates a border for good User Interface.
Thanks for reading the article!
Go to link Download
Thursday, January 12, 2017
Using RegDevelop to Create your own Hardware and System Information Program
Using RegDevelop to Create your own Hardware and System Information Program
Gathering of computer hardware and system information about the central processing unit (CPU), Memory Card (RAM), BIOS, motherboard, and other hardware peripherals are usually needed in many cases for hardware verification, driver installation and driver update.
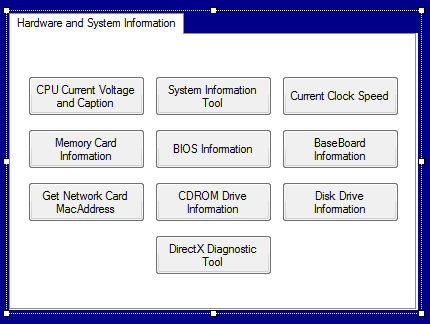
Here’s a guide to create your own program using Regdevelop. All you need are commands use to get the hardware information.
How-to-do
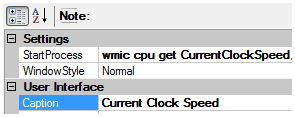
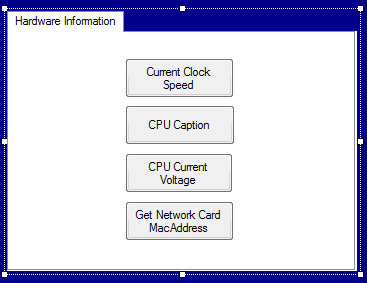
Open the program and drag the button control and start configuring the settings.
Sample Settings
----------------------------------------------------------------
Caption
CPU Current Voltage and Caption
StartProcess
cmd /k wmic cpu get caption,currentvoltage
----------------------------------------------------------------
Caption
System Information Tool
StartProcess
msinfo32
----------------------------------------------------------------
Caption
Current Clock Speed
StartProcess
wmic cpu get CurrentClockSpeed,MaxClockSpeed /every:3
----------------------------------------------------------------
Caption
Memory Card Information
StartProcess
cmd /k wmic memorychip get FormFactor,serialnumber,partnumber,speed,capacity,name
----------------------------------------------------------------
Caption
BIOS Information
StartProcess
cmd /k wmic bios get name,version,serialnumber
----------------------------------------------------------------
Caption
BaseBoard Information
StartProcess
cmd /k wmic baseboard get manufacturer,serialnumber
----------------------------------------------------------------
Caption
Get Network Card MacAddress
StartProcess
cmd /k wmic nic get macaddress,description,speed
----------------------------------------------------------------
Caption
CDROM Drive Information
StartProcess
cmd /k wmic cdrom get drive,id,volumeserialnumber,manufacturer
----------------------------------------------------------------
Caption
Disk Drive Information
StartProcess
cmd /k wmic diskdrive get model,serialnumber,size
----------------------------------------------------------------
Caption
DirectX Diagnostic Tool
StartProcess
dxdiag.exe
----------------------------------------------------------------
Finally, Click the Build Now Button. Enjoy!
Go to link Download
Monday, January 9, 2017
Using Free Download Manager In Firefox 6
Using Free Download Manager In Firefox 6
Using Free Download Manager In Firefox 6, Free Download Manager is a download manager that has long been the default I use and I think this FDM has the performance and excellent quality.
In my area an Internet connection can only use GPRS, and GPRS network the fastest in the county (max 40 Kbps) GPRS only from Telkmosel. So because the network is stuck in there, but I am not satisfied with the speed like that, then my search kumulailah om GOOGLE together, looking and looking for some tricks I was finally able to accelerate the interne connection.
This time I will discuss about the speed up downloading files using Download Manager
Sure Im not too experienced in terms of test trials, but there is little experience that I can pursue to friends,
Download Manager that I use are FDM (Free Download Manager)
Maybe there are friends who used to use FDMnya on Firefox version 5 .. but after the upgrade with the Fire Fox version 6.0 then it is not compatible anymore. Well to outsmart, in order to keep our pet FDM can be run using the following steps.
Download first add on fire fox that is flashgot (gogling definitely dapet aja). Once completed pengintsalan then install it on the toolbar firefox click tools then options, then click the download manager, we assume here we have installed FDM, click on the download manager box will display a lot of names download manager select a download manager that we install. Well finished setting it
Now try to enter the providers web file free download, click the download link, it will prompt appears, select flashgot (in the box beside it we can choose a download manager that weve ever installed) then click save then the file will be downloaded automatically using our FDM (or download manager of our choice).
Some days I did a test using the Download Manager is FlashGet and Free Download Manager, I did download the same file on the same site.
In conclusion = I prefer to use FDM because I feel a little faster (be advised that slow connection speeds up the software so it is) and not too disturbing when you are browsing while if FlashGet is fast but occasionally unstable, and the figures showed an average download speed below FDM (the results of testing me anyway) so its up friends, if anyone has any other experiences, please comment
UPDATE to the latest fersi FDM is compatible with fire fox 3, so if you want to use it no longer necessary to install FlashGot if you do not already have this please download FDM here
Go to link Download
Wednesday, December 7, 2016
Using RegDevelop to create Customized Restrictions and Policies
Using RegDevelop to create Customized Restrictions and Policies
The great thing for the software regdevelop is that, it lets you customize and create your own security policies based on Windows Registry in just few minutes.

Last month, I started studying all the users interaction and they appear to move in random everyday even if they don’t understand and know the system itself.
Trial and error is always one of our instinct one way or another.
Restrictions
If your using the home edition or other limited version of Windows, the only way you can add restriction is to use third-party tools to easily modify the registry.
Using RegDevelop to Create your own customized Security Policies
You can find the program here

Drag the checkbox control and add caption

Registry Location
HKEY_CURRENT_USERSoftwareMicrosoftWindowsCurrentVersionPoliciesExplorer
Value Name DisableTaskmgr
Value 1
ValueType DWORD
References: http://technet.microsoft.com/en-us/library/cc962658.aspx
Disable Registry Editor
RegKeyPath1
HKEY_CURRENT_USERSOFTWAREMicrosoftWindowsCurrentVersionPoliciesSystem
Value_Name1 DisableRegistryTools
ValueData1 1
ValueType1 DWORD
DeleteWhenUnchecked True
Disable Changing of Wallpaper
RegKeyPath1
HKEY_CURRENT_USERSoftwareMicrosoftWindowsCurrentVersionPoliciesActiveDesktop
Value_Name1 NoChangingWallPaper
ValueData1 1
ValueType1 DWORD
DeleteWhenUnchecked True
Disable USB Drive (reboot is needed)
RegKeyPath1
HKEY_LOCAL_MACHINESYSTEMCurrentControlSetServicesUSBSTOR
Value_Name1 Start
ValueData1 4
ValueType1 DWORD
DeleteWhenUnchecked False
RegKeyPath2
HKEY_LOCAL_MACHINESYSTEMCurrentControlSetServicesUSBSTOR
Value_Name2 Start
ValueData2 3
ValueType2 DWORD
Disable Command Prompt
RegKeyPath1
HKEY_CURRENT_USERSoftwarePoliciesMicrosoftWindowsSystem
Value_Name1 DisableCmd
ValueData1 1
ValueType1 DWORD
DeleteWhenUnchecked True
Disable Control Panel
RegKeyPath1
HKEY_LOCAL_MACHINESOFTWAREMicrosoftWindowsCurrentVersionPoliciesExplorer
Value_Name1 NoControlPanel
ValueData1 1
ValueType1 DWORD
DeleteWhenUnchecked True
If your an average user and you just want to add restrictions, try using WinBubble for Windows 7 and Vista… Simply choose the option and Click Apply to add restrictions.
Hope this Helps!
Go to link Download
Tuesday, November 22, 2016
Using BCDEDIT to change and modify Windows Boot Entries
Using BCDEDIT to change and modify Windows Boot Entries
Booting is the so called “bootstrapping” that processes and starts the OS (operating system) when the user turns on the computer. A boot sequence is the initial group of operations that the computer operates.
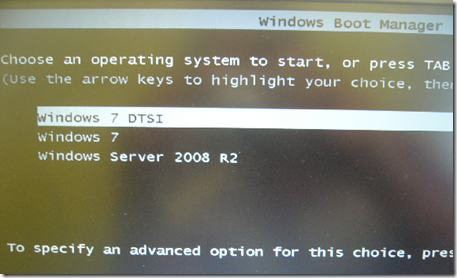
In Windows Server, 7 and Vista the bootloader file contains the necessary information is located in [root directory] ootmgr. For Windows XP, the file is tldr.
Bcdedit is a powerful tool that Windows Vista, 7 and Server 2008 uses to manage the boot entry option value in the Windows boot configuration data store (BCD).
Easiest way to edit the boot loader entry names
Open your Command Interpreter > Win + R > and type “cmd.exe” > and use the following command
| bcdedit /set {current} description "any name" |
Restart your computer to see the results…
For Windows XP users, you can read this old blog article that I wrote.
Note: It is important to backup the bcd entries first:
| bcdedit /export c:savebcdentry |
To undo the changes:
| bcdedit /import c:savebcdentry |
How to delete entry from the list
| Microsoft Windows [Version 6.0.6001] C:Windowssystem32>bcdedit Windows Boot Manager Windows Boot Loader Windows Boot Loader C:Windowssystem32> |
First, you need to know the identifier value by launching “bcdedit” as shown above and after that, you can now delete the entry “dummy OS” by using the command:
bcdedit /delete {a1d3593a-5b7-11e0-9e3c-d0a2d26a53be}
For more detailed information from Microsoft, read here..
http://WindowsForUs.com?bcdeditms3
Thanks for reading the guide!
Go to link Download
Saturday, November 5, 2016
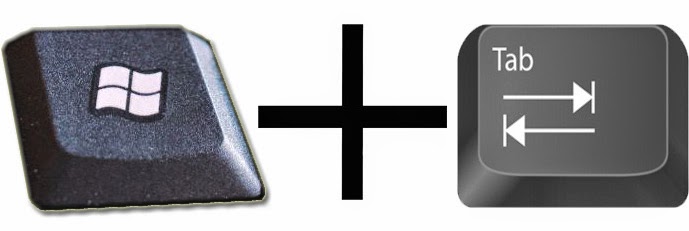
Using Aero Flip 3D Ctrl Windows logo key Tab
Using Aero Flip 3D Ctrl Windows logo key Tab
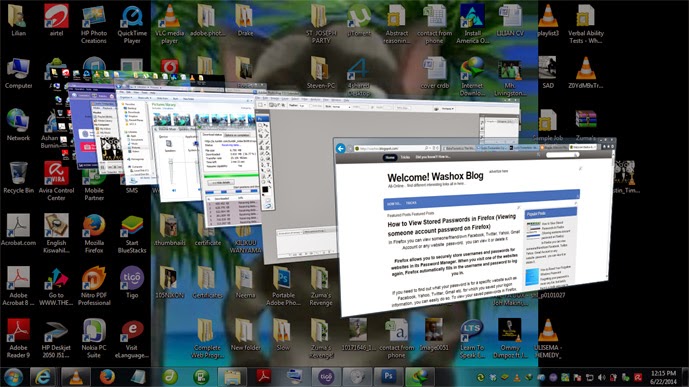
- Press Ctrl+Windows logo key
+Tab.
- Press Tab to move through the windows. (You can also press Right Arrow or Down Arrow to move forward one window, or press Left Arrow or Up Arrow to move backward one window.)
- Click a window in the stack to display that window, or click outside the stack to close Flip 3D without switching windows. You can also rotate the wheel on your mouse to quickly move through the open windows.
Go to link Download
Thursday, October 27, 2016
Using Performance Reports All Time option to view all your AdSense performance
Using Performance Reports All Time option to view all your AdSense performance
Google Adsense is a free way to earn money online. The advertising solution delivers text-based Ads that are relevant to website content pages.
Here’s how to get all the adsense data using the performance reports tab so that you can verify and analyze them starting from the beginning of implementation of the service.
Login to your email or AdSense account and Go to the Performance reports Tab.
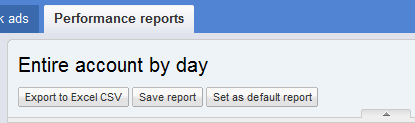
At the right side portion, find All time option as seen below:
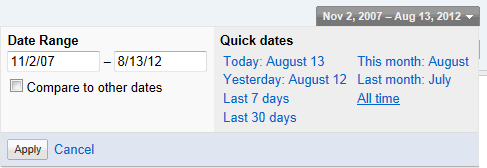
From the option, you’ll be able to analyze if your system is working or not, using the Performance graph…
That’s it! It will take time until all the data is ready to view.
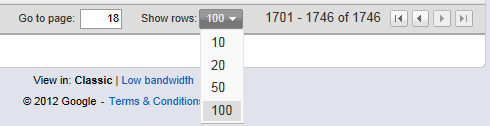
Just maximize the rows by changing the option to 100.
Adsense is being run by Google and allows publishers to make money online through advertisements that can generate revenue on either a per-click or per-impression basis.
Thanks for reading the article - Keep on reading!
Go to link Download
Wednesday, October 26, 2016
Unlimited downloads using Rapidshare
Unlimited downloads using Rapidshare
ATTENTION FOR DOWNLOADING: FOR UNLIMITED DOWNLOADS USING RAPIDSHARE:
After a few downloads rapidshare will say youve downloaded too much in less than a certain amount of time.
By doing the following directions everytime it says youve reached your limit for the time being you can do the steps and it erases it all. Then you can proceed with downloading more and more files unlimited.
Do these steps everytime needed, enjoy!
1) Delete all your cookies (tools, internet options etc in IE)
2) click start, run and type cmd
3) Type the following and push enter when instructed: * ipconfig /flushdns (Press Enter) * ipconfig /release (Press Enter) * ipconfig /renew (Press Enter) * exit (Press Enter)
Enjoy....
this is only working with DSL.
Go to link Download
Friday, October 7, 2016
Tutorial How to Make a Bootable Pen Drive using CMD Easiest Method
Tutorial How to Make a Bootable Pen Drive using CMD Easiest Method

Once in the Root Directory of your Window, goto "boot" folder [ Ex : D:win8 oot ]
Step 14.) Type "bootsect.exe/nt60 g:". ( Replace "g:" with your pen Drive Suffix )
Step 15.) Copy all the Window Files to the Pen Drive and Boot.
All Done!!
Now, you have a Bootable Pen Drive!!
To make your Pen Drive Normal, Format it with Default Options and your Pen drive will Automatically convert to Default "FAt32".
Screenshots
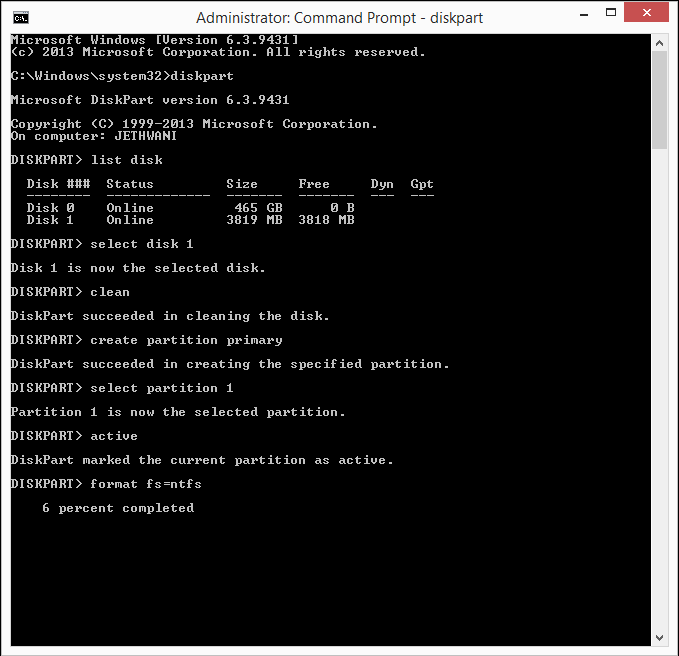
Screenshot 2
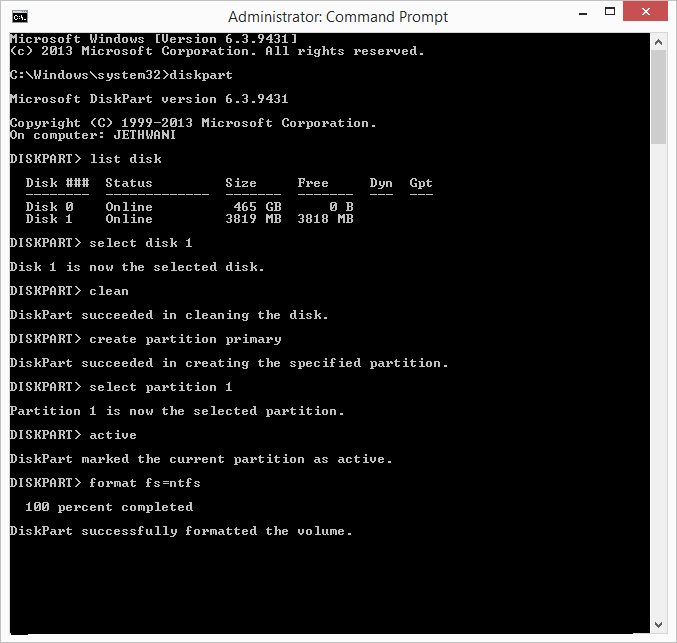
Screenshot 3
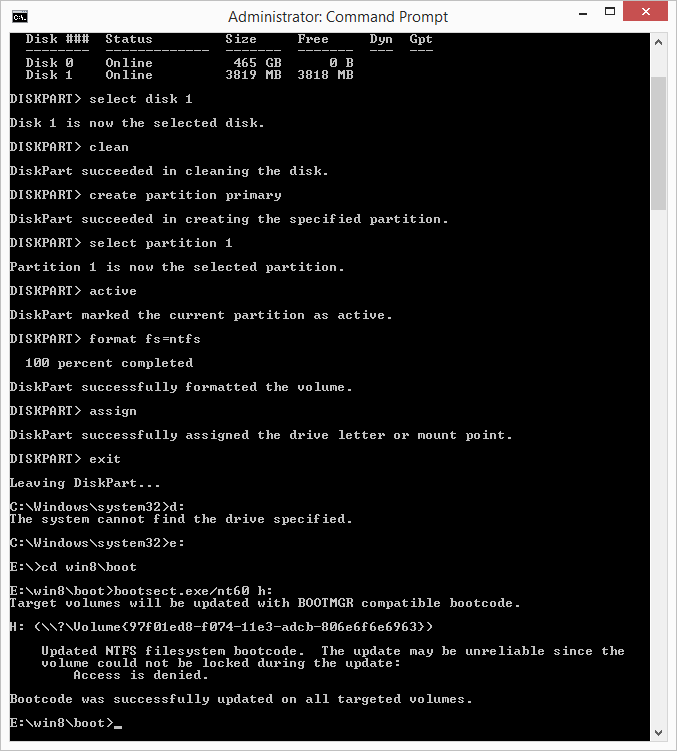

Go to link Download
Wednesday, September 14, 2016
Using Subst command to create virtual drives
Using Subst command to create virtual drives
Subst is being use to associate or substitutes folders as virtual drives. The command lets you access data easily and By functionality, its almost the same as creating folders to computer window.
Lets try using the command by creating drive S: using the folder c:files.
type “cmd” at Start search, and follow the command below

s: – virtual drive letter
files – folder that you want to associate (c:files)
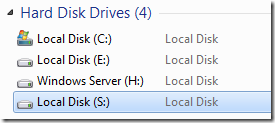
Afterwards, you’ll see the virtual drive instantly. Anyway, the problem with the command, when the computer restarts, all created virtual drives will be deleted automatically.
So, Let’s solve and try loading the commands before logging into windows.
Open your Notepad and write the command
| subst s: c:myfilesvideos subst x: c: ackup |
Use File > Save As and go to the following folder location
C:Users[username]AppDataRoamingMicrosoftWindowsStart MenuProgramsStartup
Make sure that you Click ALL Files (*.*) and write the filename
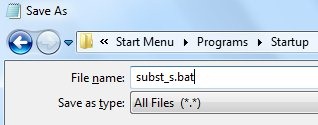
Great?!
To delete any virtual drive use the command SUBST Drive /d
e.g. Subst s: /d
Usage
| C:Usersmstouch>subst /? SUBST [drive1: [drive2:]path] SUBST drive1: /D drive1: Specifies a virtual drive to which you want to assign a path. [drive2:]path Specifies a physical drive and path you want to assign to a virtual drive. /D Deletes a substituted (virtual) drive. Type SUBST with no parameters to display a list of current virtual drives. C:Usersmstouch> |
Thanks for reading the article!
Go to link Download
Tuesday, September 6, 2016
Windows 8 Setup Installing using the MBR or GPT partition style
Windows 8 Setup Installing using the MBR or GPT partition style
When installing Windows on UEFI-based PCs using Windows Setup, your hard drive partition style must be set up to support either UEFI mode or legacy BIOS-compatibility mode.
For example, if you receive the error message: “Windows cannot be installed to this disk. The selected disk is not of the GPT partition style”, it’s because your PC is booted in UEFI mode, but your hard drive is not configured for UEFI mode. You’ve got a few options:
- Reboot the PC in legacy BIOS-compatibility mode. This option lets you keep the existing partition style.
- Reformat the drive for UEFI by using the GPT partition style. This option lets you use the PC’s UEFI firmware features.
Go to link Download