Showing posts with label how. Show all posts
Showing posts with label how. Show all posts
Tuesday, January 3, 2017
Tutorial How to Check OR Test Fake USB Flash Drives
Tutorial How to Check OR Test Fake USB Flash Drives
 |
| Learn How to Check Fake USB Flash Drives By XPCMasti.blogspot.com |
Go to link Download

Monday, January 2, 2017
What Is Google Now and How Do I Use It
What Is Google Now and How Do I Use It

When Jelly Bean was officially announced, Android users had a lot to be excited about. The latest version of the OS is super-smooth (like Butter!), there are expandable notifications that actually include functionality, there is a better keyboard, better widgets, and a better camera/gallery.
The biggest announcements, of course, were the addition of a better voice search, and with it, Google Now. So what is Google Now? Let’s find out!
Google Now is still very much in beta, so I will keep that in mind as a talk about it.
Google Now, as Google puts it, “brings you just the right information at just the right time”. The idea is that Google Now will use everything it ‘knows’ about you to deliver timely information based on your schedule, location, hobbies, time of day, and more.
Cards
Google Now presents you with this information using what they call Cards, and Android will notify you when a new Card pops up (based on your settings). For example, Google Now hit me with this card during the Yankees/Red Sox game because it knows the Yankees are my favorite baseball team:

Low blow, Google. Low blow.
I’ve organized the information Google Now presents you into two categories: Day-to-Day and Travel. Let’s look at Day-to-Day first.
To access Google Now, you just need to press ‘Google’ in the search bar that appears at the top of each screen, or swipe up from the Home button.
Day-to-Day Information
Part of what Google Now presents to you is information that will help get you through the day. This includes:
- Weather
- Traffic
- Appointments
- Public Transit
- Sports
- Places Nearby (which can be in both categories)
I’ve already shown you Sports. Google Now will use you previous searches to determine which teams you’re interested in and present you real time scores of those games. You can easily manage teams in the Settings, in case Google picks up a team you don’t really care for.
Weather is probably pretty self-explanatory; it will get your location and give you the current conditions as well as the five-day forecast. There is an option to always display this card or only display it in the morning or in the evening (for the next day’s forecast).

Local Weather
Public Transportation and Places Nearby
Both Public Transportation and Places Nearby are based on the location reading from your device’s GPS. Public Transportation will give you schedules when you’re near a Bus or Train station, as well as ‘when traveling.’
Places Nearby will show you exactly that: notable places in the area. This one is a bit interesting. I’ve been using Jelly Bean for a couple of weeks now but I can’t tell how Google Now discerns what is notable to show you. I did notice that some time after I Googled ‘Chic Fil-A’ to read up on all the recent hubbub surrounding the company, Google Now told me when I was near an establishment, but I believe there is more to it than just Google searches.

Public Transportation and Nearby Places
Appointments and Traffic
Appointments and Traffic could very well be the most useful as far as day-to-day stuff goes. With Appointments, Google Now will grab your next appointment from your calendar and display it as a card as the appointment approaches. If travel is required, it will notify you the day of, and bring up a Traffic card that gives you a traffic report and a link to directions, which is really cool!
Speaking of the traffic card, here is the description according to Google:
Get traffic conditions and alternate routes before you leave for work. Google Now also puts traffic to your next likely destination at your fingertips.
While I have experienced the latter, my commute has actually been somewhat erratic over the last couple of weeks as I’ve been running errands or making stops along the way, so my phone hasn’t been able to get a good idea of my commute. However, it has noticed I’ve been stopping at the Starbucks on campus and tells me about ones nearby when I leave work. I think as this service learns, it will get considerably better. I’ll be very interested to see how it does in a couple of months time.

Traffic based on recent search.
Travel Information
There are some services I didn’t mention above that I think better fit into the category of Travel Information. They are:
- Flights
- Translation
- Currency
- Time Back Home
Places Nearby would also qualify for this section, as I’d imagine you could probably rely on it a bit in an area you’re unfamiliar with.
Flights will grab information on flights you’ve searched for with Google and give you updates on status and traffic to the airport. This is a pretty interesting one because (since I haven’t flown since getting Jelly Bean) I’m not exactly sure how it works. My inclination would be that it could grab the flight info from your calendar, but that doesn’t seem to be the case. The card looks very cool and the idea is great, but the jury is still out on how well it works for me.

Upcoming Flight Info
Translation, Currency, and Time Back Home are much more intuitive as far as functionality and usage go. Google will grab your location and show each of the three based on the following (respective) criteria: you visit a place with a different language, you visit a place with a different currency, or you’re in a different time zone from the one you’re normally in. It would seem that with the former two, Google takes its best guess at which language and currency is being used.

Travel cards (images from Google Now’s official site)
Thoughts
The idea behind Google Now is a great one — it’s a personal assistant that doesn’t need to be engaged by the user. Theoretically, it should just work. It will also learn based on your habits and search history, which is a fascinating concept. Of course, you can be as open with it or as private as you’d like; if location and web history aren’t turned on, Google Now won’t give you too much information as it’s not getting much from you.
I’m not going to rate it because I don’t think it really fair. I haven’t travelled outside of where I live while using it and for some functionality, I haven’t given good enough patterns for it to work to it’s full potential. It’s also still in beta. I will say that from what I’ve seen, it is very cool and incredibly helpful at times. It has some very serious potential, as well as implications for the future of mobile devices.
Go to link Download
Thursday, December 15, 2016
Why should we perform disk cleanup How to perform disk cleanup
Why should we perform disk cleanup How to perform disk cleanup
If you want to reduce the number of unnecessary files on your hard disk to free up disk space and help your computer run faster, use Disk Cleanup. | ||
|---|---|---|
The Disk Cleanup tool helps you free up space on your hard disk by searching your disk for files that you can safely delete. You can choose to delete some or all of the files. Use Disk Cleanup to perform any of the following tasks to free up space on your hard disk:
You can start Disk Cleanup, by doing any of the following:
-or-
-or-
Illustration:


  |

Go to link Download
Tuesday, November 22, 2016
What is System Restore How to Create a System Restore Point in Windows 7 8 XP Vista
What is System Restore How to Create a System Restore Point in Windows 7 8 XP Vista
System Restore helps you restore your computer's system files to an earlier point in time. It's a way to undo system changes to your computer without affecting your personal files, such as e?mail, documents, or photos.
Sometimes, the installation of a program or a driver can cause an unexpected change to your computer or cause Windows to behave unpredictably. Usually, uninstalling the program or driver corrects the problem. If uninstalling doesn't fix the problem, you can try restoring your computer's system to an earlier date when everything worked correctly.
Go to link Download
Sunday, November 20, 2016
Tutorial How to Download Apps from Google Play to Computer
Tutorial How to Download Apps from Google Play to Computer
 |
| How to Download All Apps from Google Play Store to Computer in HD Video Tutorial By XPCMasti.blogspot.com |
Go to link Download
Wednesday, November 16, 2016
Video How to steal jewelery in 10 steps
Video How to steal jewelery in 10 steps
No, its not really a write up as it says in the title, but an interesting video showcasing BMWs latest Vision Connected Drive Concept.
In eye catching HD the video dazzles the viewer with all the gimmicks technology can achieve these days specially while you are driving. Imagine having all the information you would storm up available to you instantly in a blink of an eye.
Vision Connected Drive was first debuted at the Geneva Motor Show 2011. The car seems futuristic with its automatic sliding doors, partly see through engine hood. But amazingly BMW wanted to emphasise on the technological gizmos rather than the design of the car at the show.
Vision Connected Drive was first debuted at the Geneva Motor Show 2011. The car seems futuristic with its automatic sliding doors, partly see through engine hood. But amazingly BMW wanted to emphasise on the technological gizmos rather than the design of the car at the show.

This new concept was originally showcased as a example of what technology can do in the future and how each and every BMW will carry these remarkable technological aides. The roadster is one of a kind specially made for this purpose while making it an integral part of the networked world.
The concept has a heads-up display as you will see in the video as well in full 3D. All the information including navigational details are displayed here. BMW Vision ConnectedDrive Infotainment system is mainly based on the location and many other details that relates to the driver. its sensors monitor many aspects of the driver and bases the services accordingly, Many preferences can be set in the comfort of your home via your Iphone or from your PC.
now let’s have a look at the video,
now let’s have a look at the video,
Go to link Download
Friday, November 11, 2016
What is Query String and How to use it
What is Query String and How to use it
What does Query String mean?
A query string is the portion of a URL where data is passed to a Web application and/or back-end database. The reason we need query strings is that the HTTP protocol is stateless by design. For a website to be anything more than a brochure, you need to maintain state (store data). There are a number of ways to do this:
- On most Web servers, you can use something like session state server-side.
- On the client, you can store via cookies.
- Or in the URL, you can store data via a query string.

------------------------------
How to use Query String in Visual Studio ASP.NET MVC
We can use Query String using three Ways
- By URL
- By Hyper link
- By form
- By URL :
Go to HomeController.cs and add string name as a parameter in “index” action method. (here we use “index” page to show data)
public ActionResult Index (string name)
{
return view();
}
At this point, data reached to ActionMethod index of Home controller but we still dont send data from this action method to Index view
Now to send data from action method to view,there are two ways
- ViewBag
- ViewData
The difference between the syntax of these is as follows
ViewBag.f_name = waqas;
ViewData["f_name"] = waqas;
Now again go to HomeController.cs and add ViewBag line in the same Action Method
public ActionResult Index(string name)
{
ViewBag.fName = name;
return View();
}
Now we are sending data to index view ..Now well receave data at index view.
For this add following code in Index view
<h1> You Enter @ViewBag.fname </h1> //we use @ while writing c# code. This is Razor Syntex
Now Run the project and Go to following URL
localhost:2342/home/index? name=Irfan
Now “You Enter Irfan” is Showing on Webpage. This is the method how we use Query String using URL
---------------------
2. By Hyper Link
after adding the code to "Index Action method" and "Index View". Add the following hyper link link to the "Index" view
<a href="/home/success?name=Irfan"> Click Here </a>
Now Run the project, after clicking on this Link,
"You Enter Irfan" will will be shown on the webpage.
This is how we use Query String using Hyper link
---------------------
3. By Form
Now well see how to use Query String using From.
Add following form in this “Index” view.
<form action="/Home/Success" method="post">
<input type="text" id="name" name="name" />
<input type="password" id="pass" name="pass" />
<input type="submit" value="sign up" />
</form>
Now well create another Action Method and a View where we want to display data that we enter using form.
Create a ActionMethod in HomeController and named it “Success” (you can use any name)
public ActionResult Success( )
{
return View();
}
Add a View in Home folder and named it Success.cshtml. (use the same name as Action method)
Now add the following code to the “Success” Action Method
public ActionResult Success(string name,string pass)
{
ViewBag.fName = name;
ViewBag.password = pass;
return View();
}
we add Parameters to get data to this action method. We use ViewBag to send data to Success.cshtml View.
Now to receive data in Success.cshtml, we again use @ViewBag in “Success” View
<h1> @ViewBag.fName </h1>
<h1> @ViewBag.password </h1>
Now run the project and visit Index page. Add data in text fields and click on Submit.
That data will be displayed on Webpage.
Go to link Download
Friday, November 4, 2016
Use Keyboard as Mouse – How to Guide
Use Keyboard as Mouse – How to Guide
Recently My Mouse Stopped Working because of Drivers got Currupted, Device Drivers Getting Currupted in Windows May not be the Common Problem, But Can happen anytime with you, Due to this Problem i was not able to use my mouse. I Tried every possible Solution like uninstalling drivers and restarting my PC. Unplugging and then pluging in my mouse back, and yeah Searched internet too, Since i was not able to use my mouse, i had to UseKeyboard as Mouse While Finding for solution to this Problem.
Guess What ? Nothing Helped and Had to Refresh my Windows 8, But Hey, Everything happens for good. Thankfully I knew how to Use Keyboard as Mouse flawlessly. Well this was just my Reason, at times there are situations where you may need to Substitute your mouse with Keyboard. So today in this tutorial we will Learn to Use Keyboard as Mouse In Windows.
How to Use Keyboard as Mouse in Windows
Windows OS has an Inbuilt option Called MouseKeys, Not much people are aware of it but yes now you are. You can Enable/disable and disable MouseKeys very Easily.
- You can Enable it by Pressing Alt + Shift + Numlock keys. As soon as you do it, you will be prompt with the below dialog box, Just Click Yes to it.

- Make Sure your Numlock is Off while you Use keyboard as mouse.
- Done !!! Now you will see MouseKeys icon on your taskbar, which means now you are all set.
- Now talking about the Controllers, Use 8,2,4 and 6 Keys from Numpad to move Up, Down, Left and Right Respectively.
Alternatively You can also use Third Party Program Called NeatMouse , This software is portable, Main advantage to use it is it gives you better Control because of additional options that it makes available. it have an option to Remap Controller keys according to your Comfort.
Probably we will have to Use Keyboard as Mouse temporarily and not for long time so one may not prefer to get third party software for this task, but many may do it as it is free and can be helpful.
Recevie Our posts Directly to your in inbox ! Signup for our Email News Letter . Click here to Signup.
Get your own favorite tip published! Know a neat tech tip or trick? Then why not have it published here and receive full credit? Click here to tell us your tip.
Go to link Download
Wednesday, October 26, 2016
Visual C 2012 How to Program direct download link mediafire
Visual C 2012 How to Program direct download link mediafire

Appropriate for all basic-to-intermediate level courses in Visual C# 2012 programming.
Created by world-renowned programming instructors Paul and Harvey Deitel, Visual C# 2012 How to Program, Fifth Edition introduces all facets of the C# 2012 language hands-on, through hundreds of working programs. This book has been thoroughly updated to reflect the major innovations Microsoft has incorporated in Visual C# 2012; all discussions and sample code have been carefully audited against the newest Visual C# language specification.
Students begin by getting comfortable with the C# Express 2012 IDE and basic Visual C# syntax. Next, they build their skills one step at a time, mastering control structures, classes, objects, methods, variables, arrays, and the core techniques of object-oriented programming. With this strong foundation in place, the Deitels introduce more sophisticated techniques, including searching, sorting, data structures, generics, and collections. Throughout, the authors show students how to make the most of Microsoft’s Visual Studio tools. A series of appendices provide essential programming reference material.
Students begin by getting comfortable with the C# Express 2012 IDE and basic Visual C# syntax. Next, they build their skills one step at a time, mastering control structures, classes, objects, methods, variables, arrays, and the core techniques of object-oriented programming. With this strong foundation in place, the Deitels introduce more sophisticated techniques, including searching, sorting, data structures, generics, and collections. Throughout, the authors show students how to make the most of Microsoft’s Visual Studio tools. A series of appendices provide essential programming reference material.
Download link
Go to link Download
Wednesday, October 19, 2016
Tutorial How To Get Lots of Friend Requests on Facebook 2014
Tutorial How To Get Lots of Friend Requests on Facebook 2014
Hello Everyone!!
Today we are Posting How To Get Lots of Friend Requests on Facebook 2014!

Facebook is the Most Popular Social Networking Website now-a-days.
All the youth uses Facebook Regularly and many people have Thousands of Friends and many have less than that.
Many get Lots of Friend Requests but many get no Friend Requests.
But today we are Posting a Method by which you can get a Lots of Friend Requests.
On the Internet there are many Posts about this Topic but 90% of them are Fake but now we are Going to give you the Method to get lots of Friend Requests on Facebook!
To get Lots of Friend Requests, we need Lots of Email Addresses and with the Help of Email Addresses we can Invite Thousands of People on Facebook and from which 90% will Send you a Friend Request so they can Add you and Accept your Invite.
To get the List of Email Addresses, just Follow the Given Steps.
1.) Go to Mass Add Email Service.
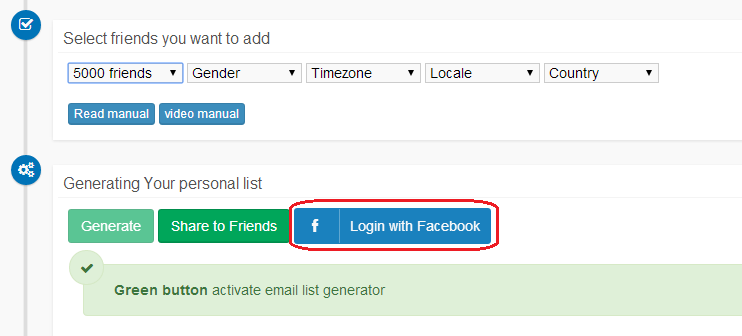
2.) After you go to the Given Site, click on the Button that says "Login with Facebook".
3.) Login with the Account on which you want lots of Friend Requests.
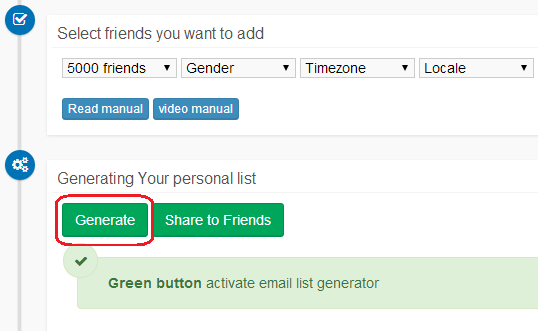
4.) Click "Generate" button.
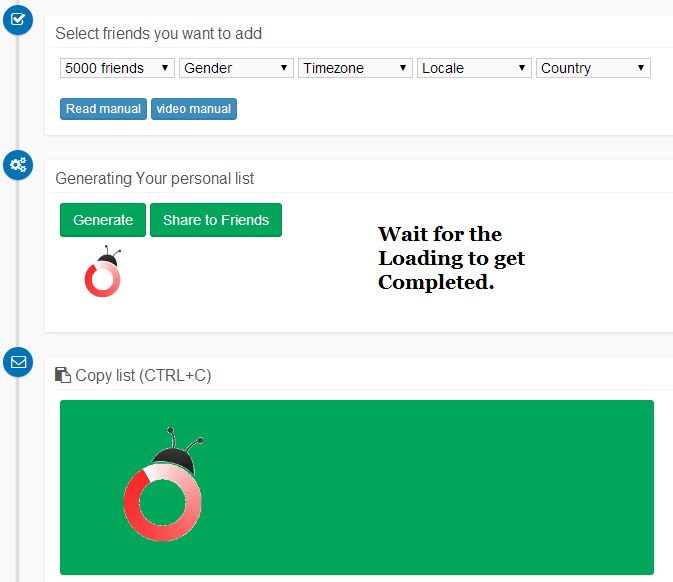
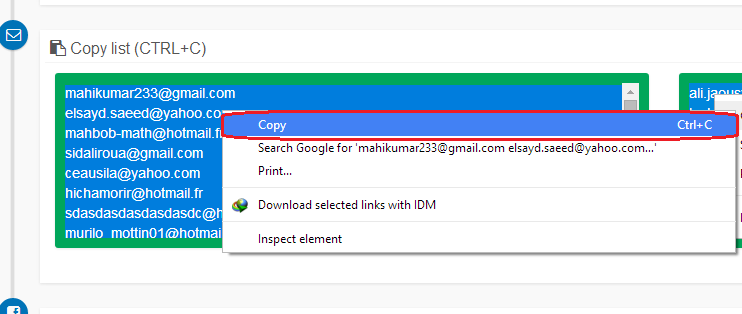
5.) Scroll a bit and you will get the List of Email Addresses. Just copy all the Email Addresses.
Okay that was the Trick to get the List of Email Addresses but the next Step is the Most Important.
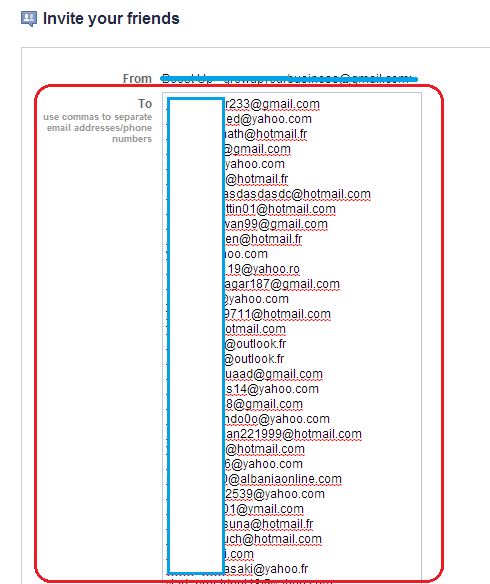
6.) Now go to Facebook Invite Page.
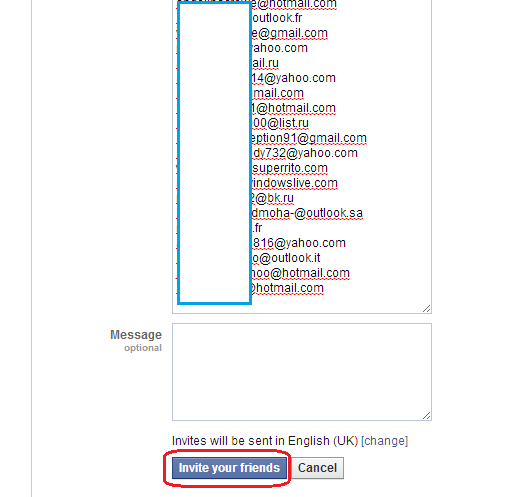
7.) Paste all the Email Addresses in the "To" Field and Leave the Message Box Empty and Click "Invite" Button.
All Done!!
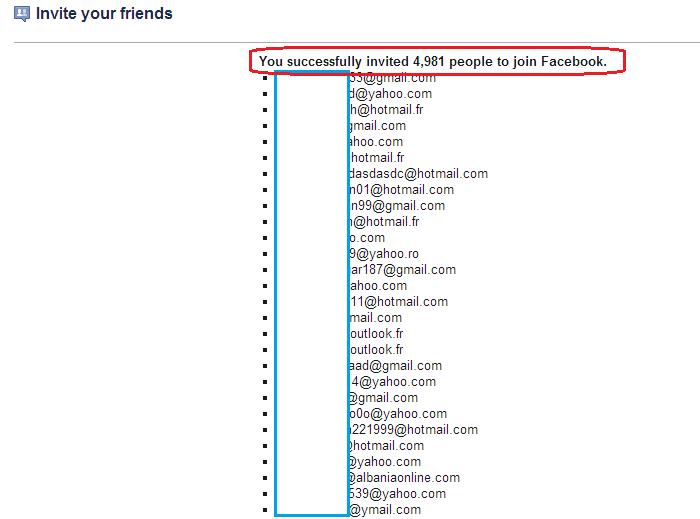
Just wait for Some Time and you will Start Getting lots of Friend Requests.
 Yogesh Jethwani. I am the Admin of YJ ES Latest Buzz. I am Professional Blogger, a Good Programmer, 2-D Game Designer and a Good Person. Check out more about me Here.
Today we are Posting How To Get Lots of Friend Requests on Facebook 2014!
All the youth uses Facebook Regularly and many people have Thousands of Friends and many have less than that.
Many get Lots of Friend Requests but many get no Friend Requests.
But today we are Posting a Method by which you can get a Lots of Friend Requests.
On the Internet there are many Posts about this Topic but 90% of them are Fake but now we are Going to give you the Method to get lots of Friend Requests on Facebook!
How To Use?
To get Lots of Friend Requests, we need Lots of Email Addresses and with the Help of Email Addresses we can Invite Thousands of People on Facebook and from which 90% will Send you a Friend Request so they can Add you and Accept your Invite.
To get the List of Email Addresses, just Follow the Given Steps.
1.) Go to Mass Add Email Service.
2.) After you go to the Given Site, click on the Button that says "Login with Facebook".
3.) Login with the Account on which you want lots of Friend Requests.
4.) Click "Generate" button.
5.) Scroll a bit and you will get the List of Email Addresses. Just copy all the Email Addresses.
Okay that was the Trick to get the List of Email Addresses but the next Step is the Most Important.
6.) Now go to Facebook Invite Page.
7.) Paste all the Email Addresses in the "To" Field and Leave the Message Box Empty and Click "Invite" Button.
All Done!!
Just wait for Some Time and you will Start Getting lots of Friend Requests.
Screenshots
Screenshot 1
Screenshot 2
Screenshot 3
Screenshot 4
Screenshot 5
Screenshot 6
Screenshot 7
If you face any Problems Regarding the Trick, Post a Comment.
Liked this Post, Dont Forget to Like us on Facebook or Join us on Our Facebook Group!!
Tell Others about Us!!
Keep Visiting!!
Posted by
Go to link Download
Friday, October 7, 2016
Tutorial How to Make a Bootable Pen Drive using CMD Easiest Method
Tutorial How to Make a Bootable Pen Drive using CMD Easiest Method
Hello Everyone!!

Today we are Posting about "How To Make a Bootable Pen Drive".
We all Use Windows, and Sometimes it gets Corrupted or We get a Lot of Virus and because of that we change Windows..
To Install Windows, we need a Bootable Disk ( NTFS type ) or a Bootable Pen Drive..
Usually, all the Disks ( DVDs ) are already NTFS Type, i.e., we Dont have to Follow any Step to Boot From Disk but when we Dont have a Bootable Disk, we need a Bootable Pen Drive to Boot From..
So, here are Some Steps that you Have to Follow to Make your Pen Drive Bootable..
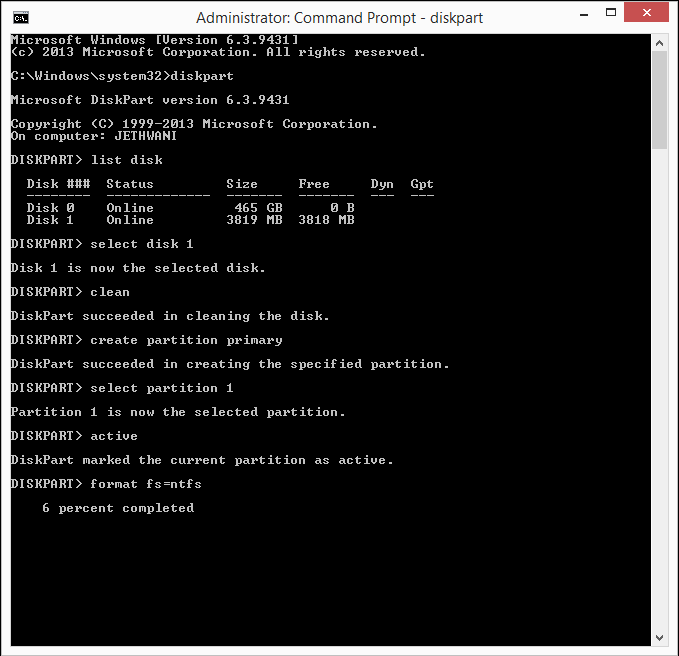
Step 1.) Click Window Key and Type "cmd" and then Run it as Administrator.
Step 2.) After you have opened cmd, type "diskpart".
Step 3.) After that type "list disk". Then it will Show you Different Disks with Their Respective Labels.
Step 4.) Once you see the Disks, Choose the One which is your pen Drive. ( You can Recognize your Pen Drive by its Size )
Step 5.) Type "select disk 1". ( In my Case, my Pen Drive is the Disk 1 )
Step 6.) Type "clean". ( It will erase everything in your Pen Drive )
Step 7.) Now, type "create partition primary".
Step 8.) Now, type "select partition 1".
Step 9.) Type "active".
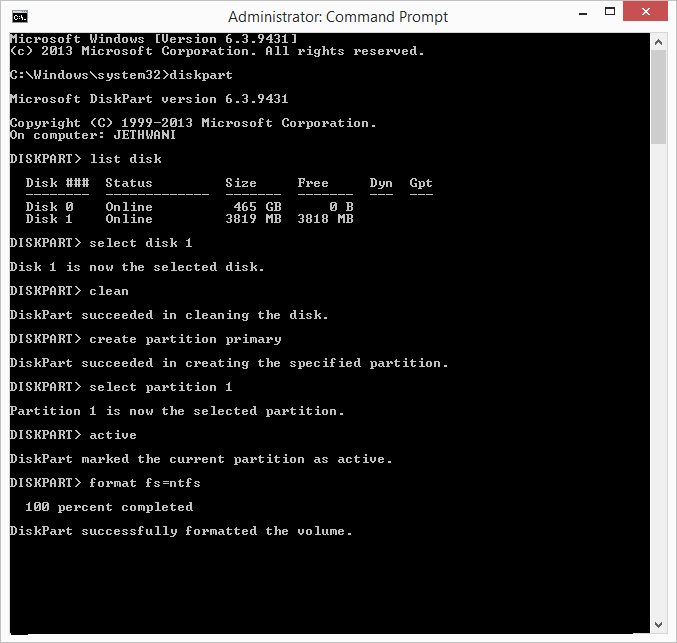
Step 10.) Now comes the Main Command, type "format fs=ntfs". ( This Step will take about 15-20 Minutes Depending upon the Speed of your System and the Size of Pen Drive )
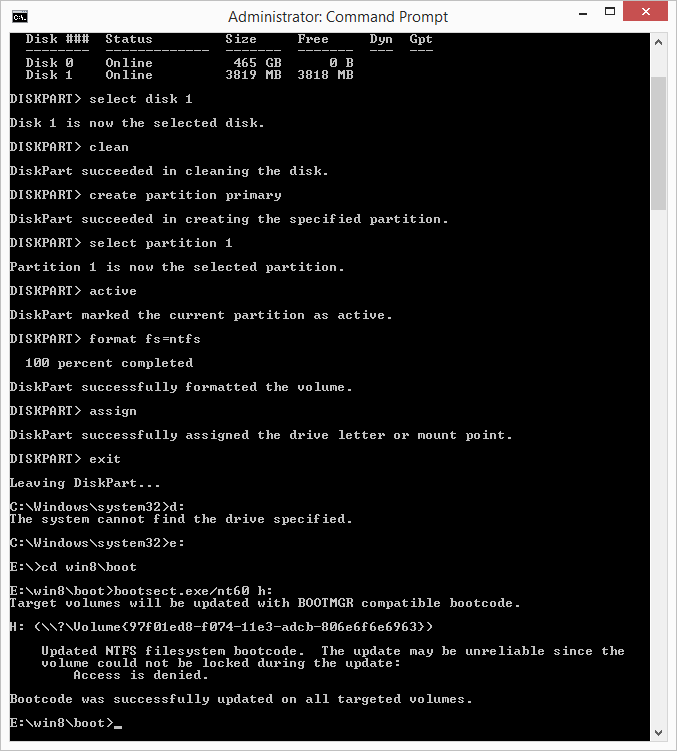
Step 11.) Once the Conversion is Completed, type "assign".
Now Open "My Computer" and you will see your Pen Drive with a Suffix, you have to Remember that. [ Ex : Removable Disk(G:) ]
Step 12.) Type "exit" to Exit from Diskpart.
Step 13.) Change your Directory from "C:WindowsSystem32" to the Directory where you have Stored Windows. [ Ex : D:win8 ]
Once in the Root Directory of your Window, goto "boot" folder [ Ex : D:win8 oot ]
Step 14.) Type "bootsect.exe/nt60 g:". ( Replace "g:" with your pen Drive Suffix )
Step 15.) Copy all the Window Files to the Pen Drive and Boot.
All Done!!
Now, you have a Bootable Pen Drive!!
To make your Pen Drive Normal, Format it with Default Options and your Pen drive will Automatically convert to Default "FAt32".
Screenshot 2
Screenshot 3
Yogesh Jethwani. I am a Student of Class 12. I am very Interested in Computers and Blogging, so I decided to start "YJ-ES Latest Buzz" and I am Working hard on it.
Once in the Root Directory of your Window, goto "boot" folder [ Ex : D:win8 oot ]
Step 14.) Type "bootsect.exe/nt60 g:". ( Replace "g:" with your pen Drive Suffix )
Step 15.) Copy all the Window Files to the Pen Drive and Boot.
All Done!!
Now, you have a Bootable Pen Drive!!
To make your Pen Drive Normal, Format it with Default Options and your Pen drive will Automatically convert to Default "FAt32".
Screenshots
Screenshot 1
Screenshot 2
Screenshot 3
If you face any Problems Regarding the Trick, Post a Comment.
Liked this Post, Dont Forget to Like us on Facebook or Join us on Our Group!!
Tell Others about Us!!
Keep Visiting!!
Posted by
Go to link Download
Subscribe to:
Posts (Atom)