Showing posts with label pen. Show all posts
Showing posts with label pen. Show all posts
Saturday, December 3, 2016
use Pen Drive as Ram
use Pen Drive as Ram
Use Pen Drive as Ram
.png)
How to use Pen Drive/Hard Disk as Ram to Speed Up Computer in Windows 7, XP, Vista, Linux:
Introduction:-
PC requirement of RAM is huge and because ram is very expensive memory so we try to minimize it by either using Hard Disk or PenDrive as RAM. Thou using hard disk and pen drive as RAM is very economical option but they are not as fast as the actual ram is so the ram space which is created through these opteration are used to store data of applications that are not currently active that is which have been stopped ,not closed but which we are not using currently.
Among the two type of external ram, pen drive is faster one because pen drive is created using much faster disk technology then hard disk.
How to use Hard Disk as RAM:-
- Goto "My Computer"
- Now Right Click on Blank Space in My Computer or simply Right Click on My Computer Icon
- Now on right click menu that appears Left Click on Property
- Now new windows will pop up here. if you are using XP then goto Advanced Tab and if you are using Higher Version then Goto Advanced System Setting option on the right in the window that appeared and then Goto Advanced Tab of the next window.
- here you can see number of Setting Button, click the setting button which is under performance section
- now in the window that appeared Goto Advanced Tab
- now in Virtual Memory Section you can see the currently allocated space and if you feel it is not present or used in less amount then click on the change button and increase the value in the window that appears

Note:- you can also see the below figure if you have any doubts.
How to Use Pen Drive as RAM:-

- First Step is identifying Software Needed
For XP or lower:- eboostr (download from here and install it).
For Vista or higher:- readyBoost (already present). - Now attach/insert your pen drive to computer.
- Now to use readyboost on windows 7
- Goto Property of Pen Drive by right clicking the pendrive icon in my computer
- now click to readyBoost tab on the window that appears
- now as you can see from the figure first press "Dedicate this device to readyboost" radio button
- then adjust the memory you want to give to ram from Pen drive
- and thats it!!
Now to use eboostr in Windows XP :
- first you need to install eboostr onto your computer and then restart the computer as asked by the software
- then open eboostr control panel from start menu
- now click continue button if you have trail version
- now you have to add one of the drive to Eboostr Control Panel by click add and then selecting one of the drive and you need to specify disk space there itself
- see the figure below if you have confusion.

Go to link Download

Friday, October 7, 2016
Tutorial How to Make a Bootable Pen Drive using CMD Easiest Method
Tutorial How to Make a Bootable Pen Drive using CMD Easiest Method
Hello Everyone!!

Today we are Posting about "How To Make a Bootable Pen Drive".
We all Use Windows, and Sometimes it gets Corrupted or We get a Lot of Virus and because of that we change Windows..
To Install Windows, we need a Bootable Disk ( NTFS type ) or a Bootable Pen Drive..
Usually, all the Disks ( DVDs ) are already NTFS Type, i.e., we Dont have to Follow any Step to Boot From Disk but when we Dont have a Bootable Disk, we need a Bootable Pen Drive to Boot From..
So, here are Some Steps that you Have to Follow to Make your Pen Drive Bootable..
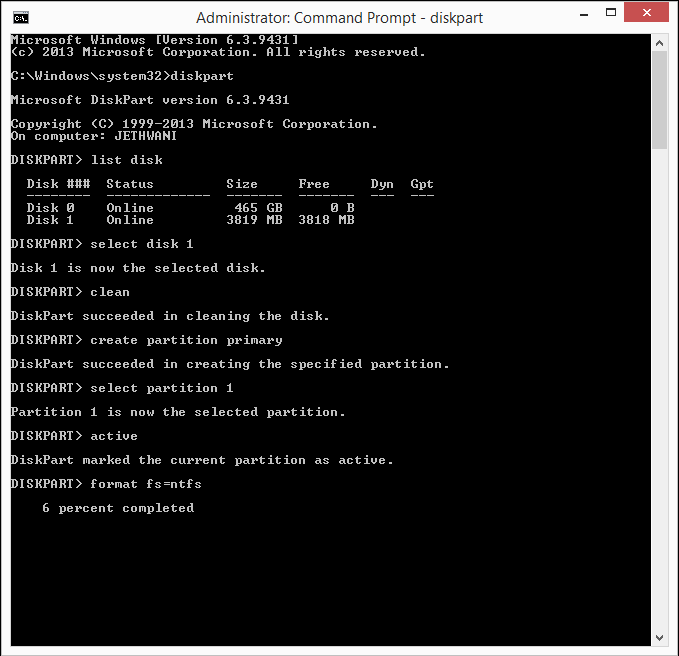
Step 1.) Click Window Key and Type "cmd" and then Run it as Administrator.
Step 2.) After you have opened cmd, type "diskpart".
Step 3.) After that type "list disk". Then it will Show you Different Disks with Their Respective Labels.
Step 4.) Once you see the Disks, Choose the One which is your pen Drive. ( You can Recognize your Pen Drive by its Size )
Step 5.) Type "select disk 1". ( In my Case, my Pen Drive is the Disk 1 )
Step 6.) Type "clean". ( It will erase everything in your Pen Drive )
Step 7.) Now, type "create partition primary".
Step 8.) Now, type "select partition 1".
Step 9.) Type "active".
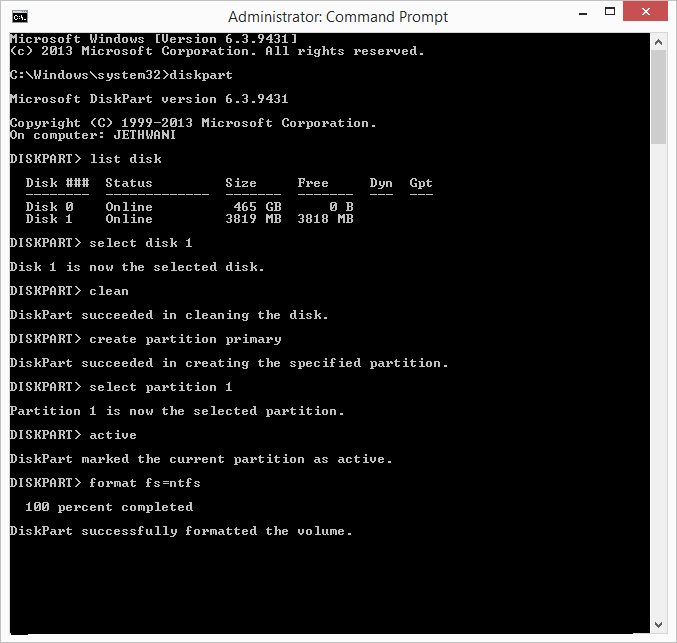
Step 10.) Now comes the Main Command, type "format fs=ntfs". ( This Step will take about 15-20 Minutes Depending upon the Speed of your System and the Size of Pen Drive )
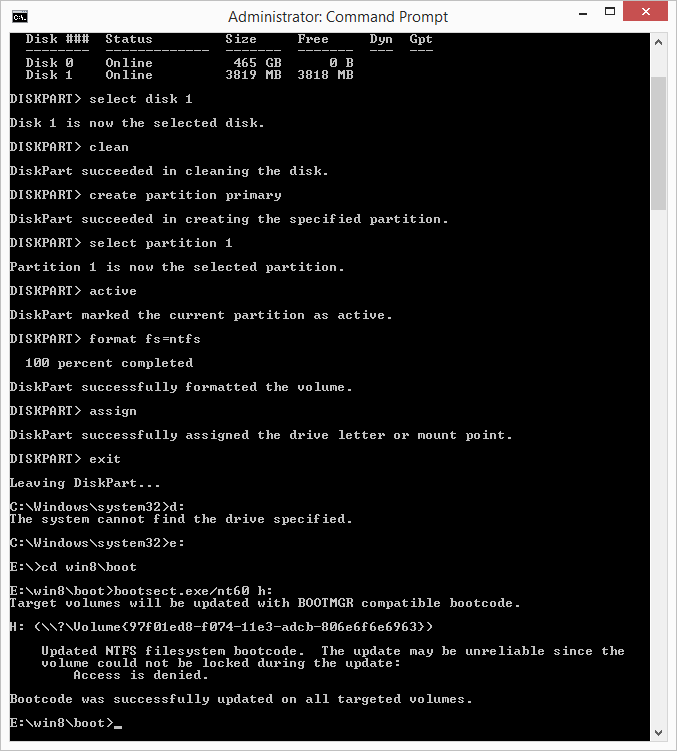
Step 11.) Once the Conversion is Completed, type "assign".
Now Open "My Computer" and you will see your Pen Drive with a Suffix, you have to Remember that. [ Ex : Removable Disk(G:) ]
Step 12.) Type "exit" to Exit from Diskpart.
Step 13.) Change your Directory from "C:WindowsSystem32" to the Directory where you have Stored Windows. [ Ex : D:win8 ]
Once in the Root Directory of your Window, goto "boot" folder [ Ex : D:win8 oot ]
Step 14.) Type "bootsect.exe/nt60 g:". ( Replace "g:" with your pen Drive Suffix )
Step 15.) Copy all the Window Files to the Pen Drive and Boot.
All Done!!
Now, you have a Bootable Pen Drive!!
To make your Pen Drive Normal, Format it with Default Options and your Pen drive will Automatically convert to Default "FAt32".
Screenshot 2
Screenshot 3
 Yogesh Jethwani. I am a Student of Class 12. I am very Interested in Computers and Blogging, so I decided to start "YJ-ES Latest Buzz" and I am Working hard on it.
Once in the Root Directory of your Window, goto "boot" folder [ Ex : D:win8 oot ]
Step 14.) Type "bootsect.exe/nt60 g:". ( Replace "g:" with your pen Drive Suffix )
Step 15.) Copy all the Window Files to the Pen Drive and Boot.
All Done!!
Now, you have a Bootable Pen Drive!!
To make your Pen Drive Normal, Format it with Default Options and your Pen drive will Automatically convert to Default "FAt32".
Screenshots
Screenshot 1
Screenshot 2
Screenshot 3
If you face any Problems Regarding the Trick, Post a Comment.
Liked this Post, Dont Forget to Like us on Facebook or Join us on Our Group!!
Tell Others about Us!!
Keep Visiting!!
Posted by
Go to link Download
Subscribe to:
Posts (Atom)